
First I opened a new page on Photoshop chose the settting 'A4' and international paper to create the following image.

Before I started designing the image I had to design which font I would be best to use so I went through the list of fonts on Photoshop and didn't find anything I like so I went to 'www.1001freefonts.com' and downloaded 'Obelix Pro' then chose the size of the text.
 After I chose the text and font size then i had to chose the colour I wanted to use for the text of the photograph.
After I chose the font, size & colour. I then proceeded to the write the text *#TeamTee*. And placed the text in the middle of the paper.

After I wrote the text in I then right clicked the photograph and clicked on 'Duplicate Layer' so I could add the text again just underneath the orignal text.

As you can see the text has been duplicated now that has been done I'm going to chose another colour for the second duplicated text that I put in.
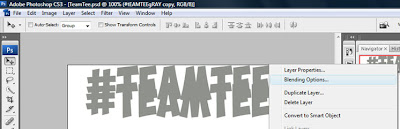
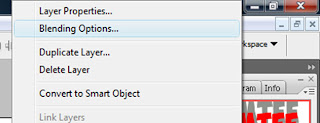
The layer of the duplicated text I right clicked on it so I can chose the 'Blend options' to change the colour of the text.

After I clicked Blend Options this window opened and once it opened I went to the box 'Colour Overlay' then I picked the colour 'Red' to become the new colour of the duplicated text I created.

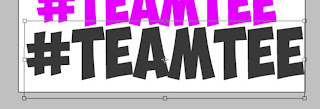
As all the previous steps I done the same thing to have the outcome for this photograph above of the text '#TeamTee' repeating in many different colours.
The box that is highlighted I'm going to use the stroke tool so I can create a outline for this text only.
I went to the Blending Options again so I could use the stroke tool to outline the last piece of text in the image.

I clicked on the 'Stroke' box so I could apply the effect to outline the text so it could stand out as it is at the bottom of the image.

Then this window appeared where I can chose the colour I want to use for the outline so I wiggled around the mouse until I found a colour I felt was suitable to be the outline then I clicked 'Ok' to confirm it.

To complete the image at the top of the toolbar I clicked on 'Brushes' so I could add some splashes to the background of the image and the I chose the colours 'Red & Grey' to be used as the background splashes.

This is the finished image I created on photoshop to use on my Rap magazine contents page.
No comments:
Post a Comment